Read More http://www.kevinandamanda.com/whatsnew/tutorials/how-to-use-a-cute-font-for-your-blogger-post-titles.html#ixzz1VEKE4Vlj
CLICK HERE FOR FREE BLOGGER TEMPLATES, LINK BUTTONS AND MORE! »

Search This Blog

Friday, September 9, 2011

One week down, and I’m still standing!


   Well,  we all survived the first week of school.  If this year goes anything like the first four days, I think it will be a great one. 

  A little bit about our first week:

The day before the big day, I took some time to prepare some frog cupcakes and some Magic Play dough.   While I am not a big fan of giving my students sugary cupcakes, I found a great picture on Pinterest that motivated me to make some for our first day.  Here is a picture of my final product:


The students loved this special treat.


The Magic Play Dough idea came from  Jenn Bates of the, Finally in First blogl .  I followed a do it yourself play dough recipe that I found online (HERE). I found that I ended up needing to double the recipe in order to have a decent size dough ball for each student.

Here are the dough balls for 18 students using a single recipe:


Making a second batch:


The final product:


I put them each in a plastic bag, had my student teacher attach the poem (see Jenn's blog), and add the food coloring.  This activity was a great success.  The students LOVED watching their play dough change colors. 

  What is great about this year is that the calendar allowed  for us to have a good four days to learn routines, procedures, and get to know each other.  I took every opportunity I could to do just that. 

In lieu of a sticker chart for each student, I decided to try using “Warm and Fuzzies or craft pom poms as incentives this year.  I found this idea from Mrs. Dillard’s blog  .  The students seem to be enjoying earning them.   I took some time to investigate how to store them and eventually came up with an idea that continued with my frog theme. 

  On the first day, the students came to their seats and found a full size picture of a frog, which I asked them to color neatly.  We then cut the frogs out and glued them to folded cardstock.  This made them look like a giant frog greeting card.  I had one of the lovely ladies in our building laminate each of the student'sa frogs.  Once the tedious task of cutting them all out was complete, my student teacher stapled a plastic bag inside of each frog.  The plastic bag is used to hold all collect warm and fuzzies.  Lastly, we used a little bit of Velcro to attach each frog to the back of the students’ chairs.  ** I love VELCRO! If you are a Velcro representative  and reading this, please feel free to send me Velcro anytime you’d like! J **


Take a peek:


On the second day of school I shared “Have You Filled A Bucket Today? with my class.  Click HERE   to find out more information about bucket filling.    After reading the book we studied the bucket filler pledge, generated a list of examples of bucket filling and bucket dipping, and then colored our own little bucket pictures.  I then placed the students’ bucket pictures on the envelopes that I had stapled to the bulletin board.  Here is a shot of our finished bulletin board:


For this week, my student teacher and I worked on filling out a bucket filler slip for each student in our class.  Today, I had the children get their slips out of their “buckets and bring them to our morning meeting carpet.  I asked if there were any volunteers who would like to read (or have me read) their bucket slip.  I suddenly had 18 hands in the air.  They were so proud to hear the nice comments we wrote about them.  Next week, I am going to work with them on filling out slips for their friends. 

  In addition to having bucket filler slips in our room, I created a baggie for the line leader to carry to specials with the class.  Taped to the bag is a brief description of what the slips are used for.  I have provided this description below:
Bucket Explanation Specials


Lastly, I have added two photos of the classroom that I forgot to snap earlier.  The first is of the math tubs that I made.  The flies on the tub are to show the differences in the difficulty levels of each of the activities within the bins.   


The second photo is the container that I created to house my F.R.O.G. binders.  Instead of buying crates (I tried but couldn’t find any green or blue ones) I used butcher paper and heavy duty packing tape to wrap a strong cardboard box.  It works perfectly to hold the students’ binders.  After they check their binder for notes, the simply place it upright in the box.   


That’s it for now.  I will try to post some pictures of some of the icebreaker activities that we did this week, including name/letter graphs, age graphs, and family tree photos made with messy green handprints! 


Happy teaching!!

Mindy Wolf

Friday, September 2, 2011

As Ready As I'm Going To Be!

 Despite saying I wasn’t going to, I went into my school today (on our day off)  to do even more work in my room.  I’m the type of person who really has to have every item on my to-do list checked off in order to feel content with leaving my room, knowing that the next time I go back, the students will be there.  While I didn’t want to, I’m glad I did go in as I was able to get my work done.  It took six hours, but it’s done. 

So, I have some finished pictures (well, sort of finished- my cell phone was going to die so I snapped some pictures earlier in the day, not right before leaving).

This first one is actually an old picture that I hadn’t posted earlier:

These are “cool down jars that I created after being inspired by a Pinterest picture I found.  The original picture came from the Here We Are Together Blog.  Thanks for the awesome idea!  I put my jar in a container with this little frog stress reliever toy.  When/if one of my students is overly excited or angry, I plan on grabbing the container, and having the student follow me to a quiet corner/table. I will allow them to squeeze the stress frog while they watch all of the glitter settle within the jar. This will give them a little bit of time to calm down and cool down!


So, the other night, a couple of my wonderful colleagues and I were in the hallway, working and talking, when one of our custodians came down the hall with a cart of items heading for the garbage.  One of them was a shelf, while another was a rolled up carpet.  Suddenly, we changed from teachers to American Pickers.  Long story short, my friend now has a new shelf and I have a “new “ carpet.  It is in great shape! I put it in my classroom library area.  Have a look..


My writing area is still a work in progress but I am okay starting school with it the way it is right now.  On the first day of school I plan on taking a picture of each student while they hold up a mini whiteboard with their name written on it.  I’m then going to laminate the pictures, hole punch them, and put them in the colored  holders in the writing area (one for boys, one for girls).  I still have to create number/number word cards to hang on one of the hooks too.

 Inspired by this picture: 
ashleeraubach3of3.jpg


 Click on the picture to take you to the originator's blog.  


This is my shelf, which is near my classroom door.  When I left today, most of the contents were off of the shelf- it looked neater than in this picture!!  Anyway, you can see my new frog birthday cakes that run along the top of the bulletin board.  Below the birthday cakes there is a jobs bulletin board, my focus wall, my Common Core Standards posters, and my Handwriting Hall of Fame.   There is also a closer picture of the Common Core Standards posters.  I purchased and downloaded them on Teachers Pay Teachers.  I laminated the pages and standards and attached Velcro to each.  I plan on posting the standards that we are addressing each day/week. 


Since changing from desks to tables this year, I used my bookshelf as book cubbies for the children.  Above the cubbies I put the carousel bookshelves that I got from a colleague.  I’ve decided that I am going to put my differentiated literacy lily pad centers in them.  I plan on laminating manila envelopes and putting the center activities in each.  I used clear contact paper to cover lily pad cut outs, which I numbered and attached to each little basket.  On the front of the lily pads, I attached some Velcro.  I then created little flies, which I also attached Velcro to.  If the activity is more of a below level activity, I will put one fly on the lily pad, if it is on-level, I will put two flies, if it is advanced, I will put three.  We will see how it works.  I may need to change things.


This is a shot of my Morning Meeting area.  In the picture you can see my finished supply bins, my calendar, and my shelving unit for the students’ Morning Meeting binders.  I’ve provided my morning meeting sheet for you to see/use below. 
Calendar Books
Morning Meeting Cover


This is the other end of my Morning Meeting area. You can see my Morning Meeting board and my art center. 


This is a shot of the room from my coatroom.  I love all of the space that I have now that I have switched from desks to tables.


I decided to decorate my desk a little.  I still think it is a little bare.  I think I am going to add a couple of pictures of my animals.


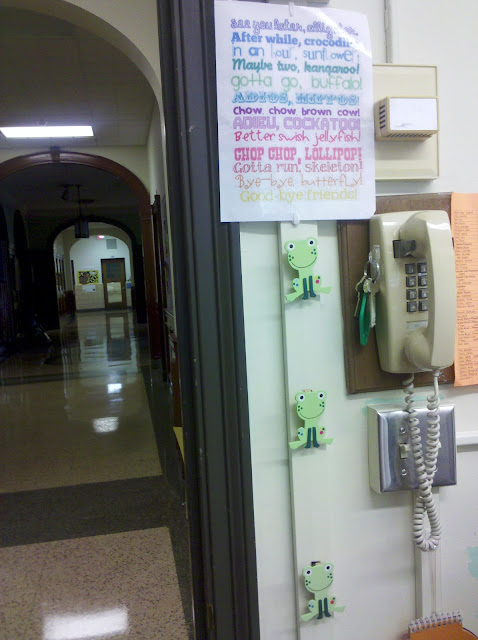
This too is a Pinterest inspired creation.  I created these cute frog clips and “Velcro-ed them to the wall near the door.  When students send notes about early dismissal, I always have to send them (the notes) to the office.  I then have to write myself a reminder note.  I figured that this would be a great place to clip them.  I plan on keeping all of my reminder notes as well!  Document, document, document!! I think I am going to create a flip chart with empty envelopes, with a month written on each. I’m just going to put each note in the appropriate envelope. 

  In this picture you can also see the, “See You Later Alligator poem that I printed (after- again- seeing it on Pinterest).  I thought it would be a good community building activity to take turns saying each line at the end of each day. 


See-You-Later-Alligator.jpg
Click the picture to take you to the original blog and a printable version!! 


Lastly,  this is my new schedule bulletin board.  I feel like this is one of the things that I change every year.  I never love each year’s bulletin board enough to repeat the next year.  I do however, like the clocks as the students can match the time up with our classroom clock.  I guess we will  have to wait and see if this one lasts to live another year, next year. 


The only picture that I am missing is  the picture of my finished math tubs.  They too are differentiated like my literacy lily pads.  There are two bins with 3 flies, two bins with two flies, and two bins with 1 fly.   I will post that picture soon!

Next week will be busy but I will try to post about our first few days!!  I’m so excited!