As much as I hate having to give my students a 30-some page benchmark test, I enjoy the fact that I have the whole week to do it, which means that I have some extra time in my schedule to explore new things during benchmark week.
At the beginning of the month, I had registered for the Pumpkin Seed Project on Projects by Jen. Knowing that I had to complete that activity during this week (and with Halloween coming up), I figured I would jump on the pumpkin unit bandwagon. Along with almost every other primary teacher in my building, I made a one- week mini unit on pumpkins.
Below are some photographs from our pumpkin fun:

The large pumpkin chart was a chart that we made from looking at the outside of a pumpkin. The students used their senses to come up with adjectives they could use to describe the outside of the pumpkin. In addition to putting the adjectives on the chart, each student had a sheet to put the words on as well.
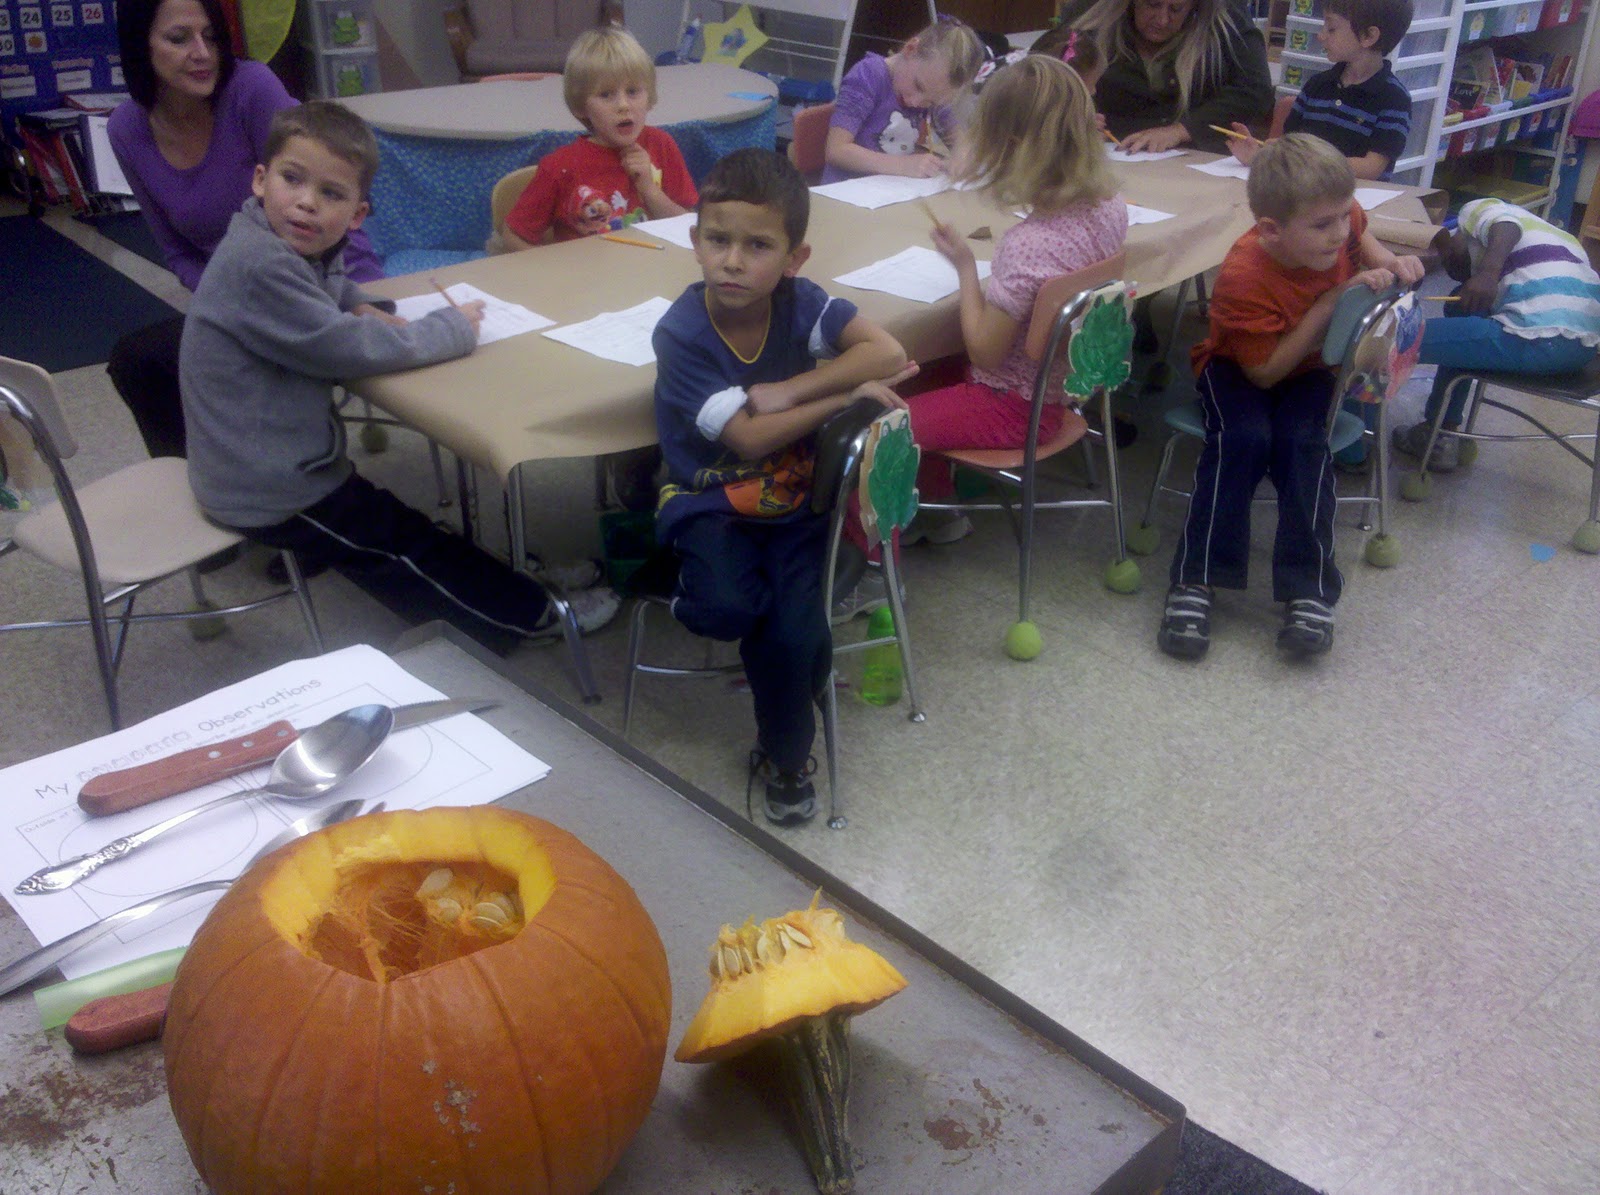
The next day, we opened the pumpkin up and wrote down adjectives to describe the inside of the pumpkin. The students passed around the pumpkin, feeling the “yucky” “smushy” inside ! On Monday, the students are going to use one of the adjectives (for the outside or inside) to write a pumpkin simile. I am then going to scan their sentence and picture and make a class book on Little Bird Tales (great website for primary classrooms)! I’ll be sure to post it to here when we are finished!


The Projects by Jen project required that we predict and then count the number of seeds in a pumpkin that weighed less than 5 pounds. When I went to the pumpkin farm to get my pumpkin, I found that the 4.9 lb pumpkin was rather small. With 18 students in my class, I decided to buy another 4.9 lb pumpkin. I have two large tables in my room, so I gave each table a pumpkin. One pumpkin had a red dot on it while the other had a blue dot. Each child was then presented with a pumpkin die-cut, with the corresponding color dot for their table. They had to put their initials and their seed count guess on their die-cut. After that, we made a list of our guesses. Next, came time for them to guess the pumpkin’s circumference. I walked around with a roll of string and told the students that I was going to keep unraveling the string until they told me to stop. They then used their scissors to cut the string. We then taped their string to the pumpkin die-cut. Later in the day, we measured their strings around the pumpkin. We had one student get it spot on! Another was just a little bit over! You can see a picture of their die-cuts and their circumference guesses in the picture above (with the pumpkin chart).

With all of the seeds, we decided to guess how far our seeds would go if we stretch them from end to end, down the hallway. To make this task easier, I had my aide cut strips of paper into one foot lengths. I then taped the strips to my students’ table spots and had them use their squeeze glue to glue the seeds on. Unfortunately, we ran out of time on Friday to stretch our seeds out. We will make our guesses and try it out on Monday!!
The extra time this week also gave me an opportunity to test out our new laptop carts (being the primary level tech team leader has its advantages). Our school recently purchased two laptop carts, each with 15 laptops. I was asked to take one of the carts to experiment with, as I am going to be holding an afterschool meeting soon to teach my colleagues how to use them. I was thrilled to get started right away!


Our first experimentation was with using a familiar website (www.abcya.com), to practice our math skills. I figured it would be easiest to start with something that they were familiar with. I wanted to take the time to show them how to use the laptop, before introducing something completely new on the computer. I was surprisingly shocked by how easy it was for all of the children to use the mouse pad rather than an actual mouse. I was anticipating having to spend a little time with modeling how to use their finger to navigate, but that wasn’t the case!

The next day, we used PiratePad to “share the keyboard”. We were taking the writing section of our benchmark that day, so I thought it would be a good time to discuss a sentence rubric. Earlier in the year, I had created a picture rubric with the students. We rated four pictures, with scores of 1-4, 4 being the best. Keeping with the same concept, I asked the students to tell me what was the difference between the “4” picture and the “1” picture. They were able to tell me that I used more details in the “4” picture. I piggybacked off of that to show them how they can create a “4” sentence simply by adding a few more details. I then pulled up four pictures on the SMARTBoard (similar to our picture rubric). In addition to the four pictures, there were four sentences. Each sentence was similar, yet each one added a few more details. The children had to match the sentence to the correct picture.

Having done very well with the previous activities, we took to the laptops and PiratePad. For those of you who aren’t familiar with the website, PiratePad is a shared work page, where students can input text to the page while using different computers. I started by creating and opening our Pirate Pad work page on my computer/SMARTBoard. My consultant teacher and I then put the url on all of the laptops for the students (eventually, I will have the students do this on their own, however, being the first time, we went ahead and did it while they had a work period at their tables). For this activity, I had the students work in partners, each pair having a laptop. I explained to them how this page worked, and allowed them each the opportunity to type their names onto the page. They loved being able to see what they were typing, up on the SMARTBoard. Now, I should add that this was a little chaotic at first. The children had to learn to click their mouse exactly where they wanted to type, otherwise, they would all be typing on the same line and in between other students’ names. I let them experiment finding their own line and making sure that their name was the only name on that line. Once they got it, the activity ran beautifully. ** My consultant teacher and I took turns typing sentences on the work page. When we finished a sentence, the children then clicked by their name and scored our sentences. They LOVED it!
**My tip to teachers who are hesitant with trying technology because it is new to them…. don’t get frustrated! You have to be open to the possibility that things may be a little dicey at first. That is okay though! It may be a little noisy, you may have to troubleshoot a few issues, but once you get everyone on the same page…. it’s awesome! Plus, the more you use it in the room, the more the novelty will wear off and the silliness ( typing the letter “y” repeatedly, instead of just once, etc.) will dissipate.
Here are a few random activities that we have completed recently:
Mummy Math - In an effort to spice up the, “Ways to Make 4, 5, and 6” lesson , I gave each child a tag board “mummy head”. Each mummy had a number stapled to its chin. That was the sum that the student would be working with. I then gave them a cup of red/yellow counters with the appropriate sum inside. They had to shake/dump the counters, and write the addition sentence on a strip of white paper. They then glued that strip to their mummy’s head. They repeated this until they had filled the mummy’s head with strips of paper. Last but not least, they added two googly eyes as a finishing touch.
(Prior to them completing their own independently, we worked on a mummy head showing ways to make 4, together)

Blend Blobs – We teach initial blends in October, which is perfect because our blend blobs make great Halloween decorations!! After talking about what a blend is, each child randomly picked a blend from a deck of blend cards. They then had to write three words that start with their blend. I gave the children 3x5 cards to write their blend words on (with pencil). Once I checked to see if their words were spelled correctly, I allowed them to trace over them with marker. Next, I gave the children a large sheet of construction paper. I asked them to use the paints I put out to make one large blob of paint ( I modeled first what a blob looks like), and then three little blobs.
The next day (we let the blobs dry overnight), the children cut out their blobs and added a nose, eyes, and tongue to their big blob. At the end of the tongue, they glued their blend card. Then, they cut out their blend words and glued one blend word to each of their little blobs. Lastly, I helped them string their little blobs under their big blob head. They end up with this cute creation!

Have a Happy Halloween everyone!!!
Happy Teaching,
Mindy Wolf


No comments:
Post a Comment