Read More http://www.kevinandamanda.com/whatsnew/tutorials/how-to-use-a-cute-font-for-your-blogger-post-titles.html#ixzz1VEKE4Vlj
CLICK HERE FOR FREE BLOGGER TEMPLATES, LINK BUTTONS AND MORE! »

Search This Blog

Friday, August 26, 2011

Are You A Bucket Filler?


So, a large chunk of my morning was devoted to my bucket filler board.  If “bucket filler” is a new term for you, I would suggest picking up the story, Have You Filled A Bucket Today?  It is a great story that teaches children the importance of being kind to one another.  I purchased the story and thought I would use it to assist in our community building approach.  It also supports the nation-wide anti-bullying campaign. 

  I initially learned about bucket filling from Mrs. Dillard’s blog.  She has a wealth of printables and things for you to use for your bucket filler board.  If you haven’t been to her blog, what are you waiting for?!?!  Thanks for all your resources, Mrs. Dillard!

  Inspired by the story, I thought it would be great to have my students be bucket fillers.   As part of their literacy centers, I plan on having one of their “Must Do” activities being to fill out a bucket filler slip for someone else.  Basically, they have to pick up a slip and write something nice about someone else on it.  Then, they put the slip in the “bucket” of the person they wrote about.  On Fridays the students can read their slips.  (I will talk to the class about the importance of making sure that everyone’s bucket has at least one slip each week. If I notice that there is an empty bucket, I will be sure to add a slip myself).

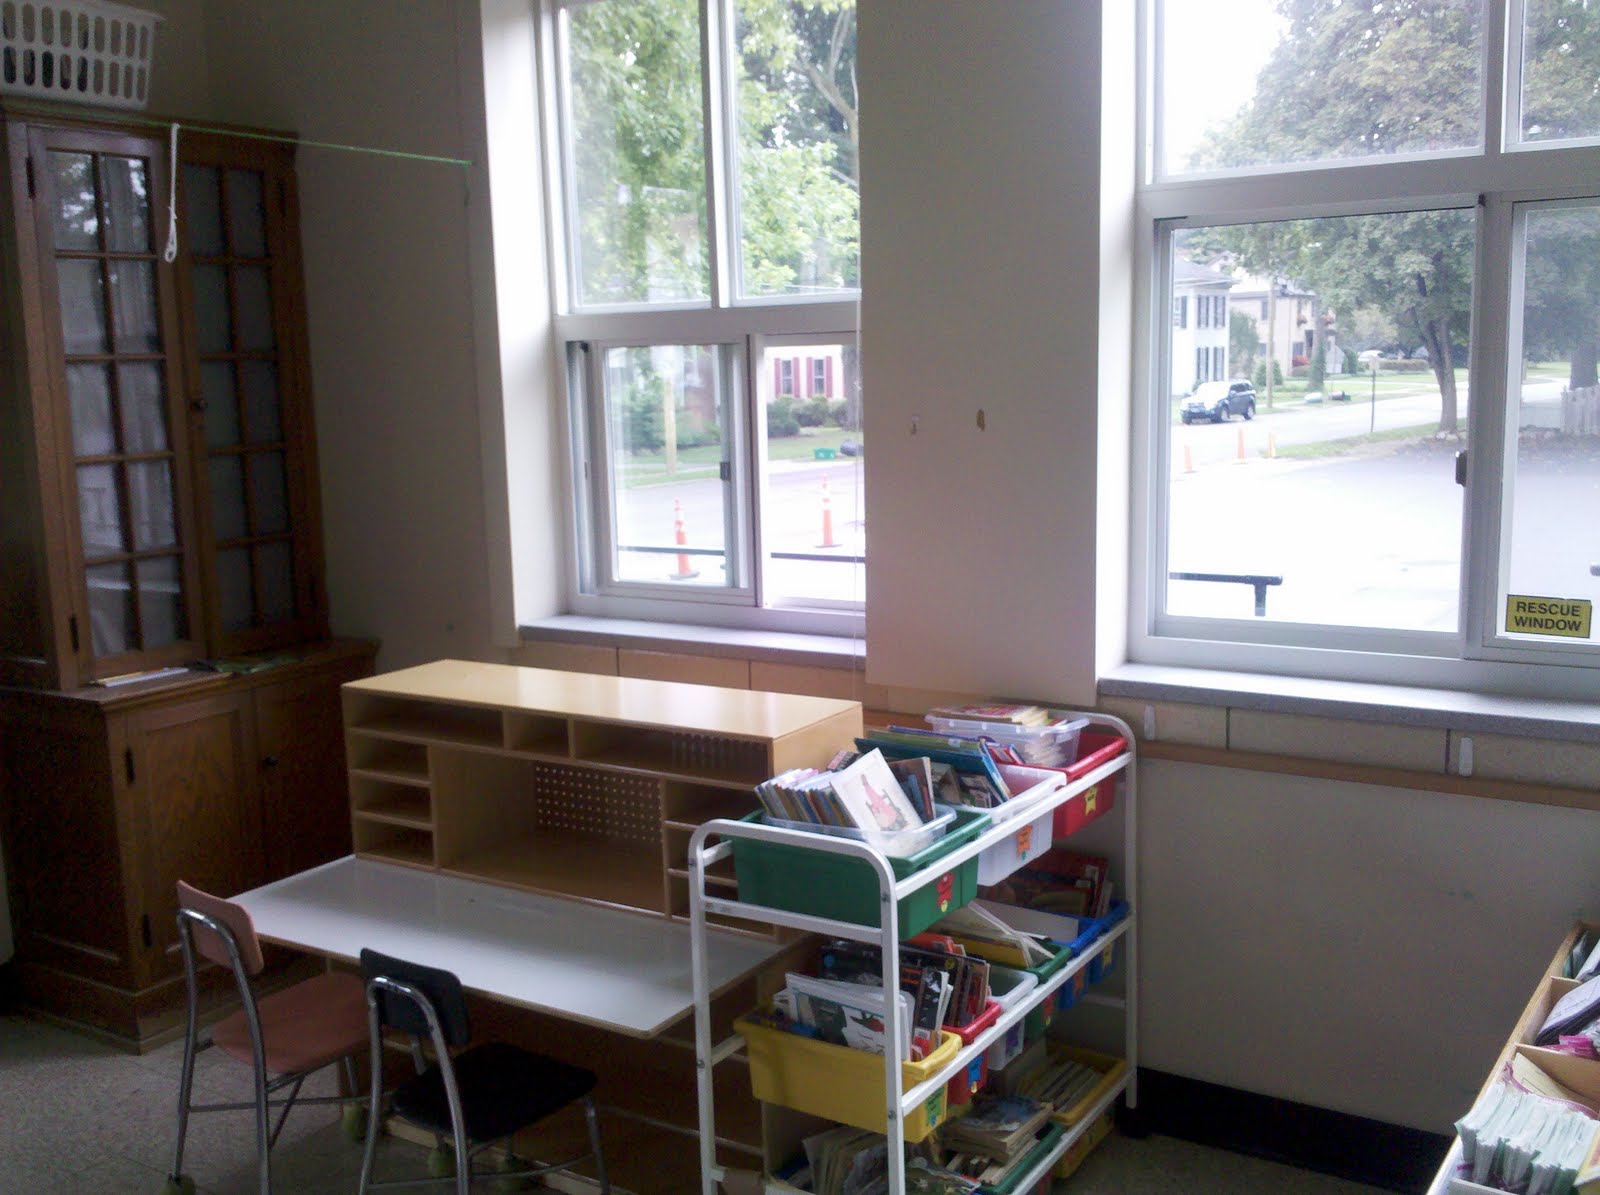
Here is a picture of my bucket filler board.


  So how did I make my board? First, I typed up the “Bucket Filler” pledge (below).  I then used the website, www.blockposters.com to enlarge it (Be sure to save the PDF as JPG first).  I want it large so my students will be able to see it from our Morning Meeting carpet.  Just as we say the Pledge of Allegiance each morning, I plan on having the class say the Bucket Filler pledge each morning as well. 
Bucket Filler


   Underneath the pledge I created a 3-D bucket of my own using some odds and ends I had in my craft drawers.  Then, under that you will see little library card envelopes.  I plan on having the students color their own little “bucket”, which I will then attach to their envelope.  I will then post the students’ names below their envelope.  The blue envelopes are for the adults in our room this year.  The purple holder in the corner will hold the bucket slips.


After reading the story to the class, I plan on encouraging the students to discuss examples of bucket filling activities and things they could write on the bucket slips.  We will also discuss examples of “bucket dipping,” which is when you do hurtful things to others.  I will then post the filling and dipping examples on either side of my 3-D bucket model.  The students can use the bucket filler examples to assist them in completing their bucket filler slips.

 I also intend on sending some slips with the class when they travel to specials.  Therefore, they will be inspired to be kind throughout the entire day. 

  Think of how great you feel when someone compliments you. I intend to create an environment where my students feel proud and positive all year long.  


Wednesday, August 24, 2011

It's Been A Little While!


Well, wouldn’t you know that I got a large chunk of my bulletin boards done today, yet, my cell phone died in the process. Therefore, I wasn’t able to snap any pictures of those.  I will be sure to grab some tomorrow!  I did have this picture to post from the other day though:


 I made this valance with the left over fabric from my crate chairs and guided reading table.  I was too impatient to go home and pull out the sewing machine (which I still haven’t used since inheriting it from my husband’s grandmother) so I used my “No Stitch” glue and sealed the top and bottom of the fabric.  I then used a large dowel and a couple of pencils instead of going out and buying a suspension rod. I threaded the dowel through the valance and then used some of those 3M hooks to hold it up.    I love how it turned out!

                             I also wanted to share these:


Has anyone every used these before?!?!?! 

   My wonderful husband came home with these for me today! Such a sweetie! Apparently they were in the $1 bin at Office Max today.  I used them to address my Welcome Back to School Letters.  They are a lot of fun to write with.  I will definitely be putting these in my writing center.  I love Crayola! 

Sunday, August 21, 2011

Welcome To School Letter

  Now is the time when I start preparing my back to school introduction notes.   Shortly after the school sends out the teacher assignment letters, I send my introduction letter to my students. 

  Within each letter I send 2 introduction letters, one is a letter to the parents, while the other is a letter for the student.  In addition to those two, I also send a small class list, a short description of how you can get to my website, a parent questionnaire, and a little badge for the students to wear on the first day.

 Below you can find  the little paragraph I send home with the badge and the parent questionnaire form. 

  This is the first year that I am sending home the questionnaire form with the introduction packet.  Usually, I save the questionnaire for Open House, however, the questionnaire is how I figure out parent email addresses.  Since our Open House is about two weeks after school begins ( and I hate waiting that long to have the parent contact information)  I am sending it with the packet.  In the parent introduction letter, I invite the students and parents to stop at school a week before the first day.  At that time, they can bring in their supplies and meet me.  I plan on asking parents to bring the completed questionnaire form at that time.    This will also give me a heads up on each students dismissal procedure. 
I ordered these from www.reallygoodstuff.com 


2011 Badge
Parent Questionnaire

Feel free to use what you would like.  All I ask is that you leave a comment!

UPDATE: In addition to the other goodies listed above, I found this great idea from Denise, on her Sunny Days in Second Grade blog.  It is an envelope with the following poem inside:

The night before school is exciting and fun.
There are always so many things to be done.

Your clothes are ready, your backpack is too.
Your classroom is full of fun things you will do.

Lots of questions go through your mind,
All types of thoughts of every kind.

But sometimes we all get the jitters down deep.
And that makes it hard to fall fast asleep.

So I’ve made this magic confetti for you,
full of promises for the whole year through.

Oh Monday night when you lay down your head,
Just sprinkle some under your pillow in bed.

The confetti will help you sleep through the night
and wake up in the morning fresh and bright.

I’ll sprinkle the confetti under my pillow, too
Because I am so super excited to see you!

Sweet Dreams!


Denise posted the poem for additional days of the week as well - in case you don't start on a Tuesday! Be sure to check her page out! 


  In an effort to cut back on needing extra postage for my letter :), I took some library card envelopes and filled them with a small printout of her poem, along with some sequin confetti.  I then folded the top of the envelope down and sealed it with a label that said, "Don't Open Until September 5th. No Peeking." It worked out perfectly!  I hope the kids enjoy it!  


                              Thanks for the great idea, Denise!


(I took the picture with my cell phone.  Apparently there is an issue with the lens as there was no weird stain on the envelope!  Grrr!  )


Freebie Alert- Frog Themed Voice Level Chart!


I found this Voice Level chart on Pinterest.  Unfortunately, the blog it originated from is no longer available.    I changed it to fit my frog theme.  If you are using frogs this year, please feel free to snag it!  All I ask is that you leave a comment with a link back to your blog, if you have one!
2011 Voice Levels


The graphics came from www.scrappindoodles.com

Saturday, August 20, 2011

Frog Themed Behavior Plan


  While exploring Pinterest, I found many teachers are using a behavior management chart that revolves around the children moving a clip up and down the board. Following with the same idea, I tweaked it a bit to fit my frog them.  

  Each day the students start with their clip on, Ready to Learn.  Should I catch them behaving, I/they move their clip up. Should they misbehave, I/they move their clip down.  Students who make it to the top of the chart, earn  a sticker for their clip.  Once they have 5 stickers on their clip, they get a new clip, which they color red.  The process continues through the colors of the rainbow, all the while working their way towards the coveted, Glitter Clip. 

   Below I have posted the letter I plan to send home explaining the policy, the notes I intend to send home when a student makes it all the way to the bottom of the board, and the actual frogs that I am using to create the wall display.

  I am eager to see how this works. I like the idea that they are working towards earning the next clip, rather than a cheap dollar store toy from a prize box.  This might motivate other students to use good behavior when they notice which color their friend is on.

    Last year, we had a Tae Kwon Do instructor come to our P.E. class. Many of the students LOVED it and signed up.  They very much enjoyed coming in and sharing how they earned the next colored belt.  I think this will be similar- at least I hope! 


  Here is a picture of the final product:

* The graphics were free clipart from www.cutecolors.com
Classroom Behavior
2011 Frog Note Home
2011 Frog Behavior Plan

Want to see additional behavior management ideas?  Click HERE

Feel free to use any of the uploads. All I ask is that you comment with a link to your blog, if you have one.


*** While it is only day four of school, our behavior management chart has been a huge hit.  The students are so proud when I ring the bell and move their clips up.  So far I have only had to move one clip down, and only one spot! ***

Frog Themed Room Pictures


As promised, below I have posted pictures of my classroom with the new pond-like décor that I purchased. 


Lastly, here is the finished guided reading table.  I think it looks much better with the curtain around it.  I also stapled a ribbon across the cushion of each crate, which makes it easier to lift the lid off.  


If you enjoyed checking out these classroom photos, be sure to visit the Teaching Blog Addict Classroom Photos Linky Party to see other classrooms pictures.  Click the picture below to get there! 

classroom+link+party+pic+small.jpg


Friday, August 19, 2011

Ideas from blog-stalking


I created a couple more items, inspired by my blog stalking (I wish I remember which blogs. If the ideas came from your blog, please leave me a comment and I will give you credit. Thanks.)  The first is a set of frog counters.  I just did the face, however, I wish I had condensed it a little more so I could have fit the body on.  I think they look just like green smiley faces now.  Oh well!


The next thing I made were alphabet stones using decorative rocks and acrylics.  I choose one color for capital letters and used 4 different colors.  Of course, I used Modge Podge to cover both the rocks and the frog counters. 


Thursday, August 18, 2011

The Fun Continues


  After helping my friend set up her computers in her room, I made my way to my classroom.  Little did I know, that process was going to take me about 20 minutes.  I stopped along the way to say hello to my eager teacher friends who all had the same idea I did get to the school and get some work done! 

  Anyway, I finally got to my classroom, opened the windows, turned on Pandora, and thought, where in the heck should I start?!?!? 

   This is my first year as Mrs. Wolf.  After getting married last April, I received my new nameplate.  Unfortunately, I wasnt able to get it attached to my door before I left.  When I returned to my room earlier in the week, I noticed it was attached, however, they left a big gap between the room number and my name.  No offense to those who put it up, but my OCD self would be bothered by it for a long time unless I fixed it.  Therefore, I pulled out my little toolkit and fixed it.  I realized a long time ago that if you want something done right, you need to do it yourself (at least things you know how to do)!   Its official :


Another accomplishment today was filling my crate chairs with guided reading materials.  Following with my frog theme, I created these Leaping Learning Tubs.  When the students come to the guided reading table, they can pull out these tubs and be ready to learn.


I havent finished putting in all the items yet however, so far I have included a dry erase board and eraser (the students have their own markers), a frog finger puppet for retelling stories, a monster finger for pointing to words, a reading phone, and highlighting tape.  I plan to add a bookmark with all of our reading strategy animals on it as well.  I may add more things as I think of them.


Heres also a peek of my daily organization trays:


I stopped on my way home to get some fake cattails and ornamental grass to put up near my windows as a way to further portray the pond-like atmosphere.  Stay tuned for pictures!!
  

Tuesday, August 16, 2011

Day Two... the fun continues!


Day Two- I had to get up early today to take our kittens to the vet for surgery.  Here are my little babies, Ginger and Zoe. 


After feeling a little sad about dropping them off overnight, I needed to get to work so I wasn’t thinking about them all day!  Luckily, our vet is located about a block or two from my school.  I was to school by 8:30! Yes, I had a good 6 hours to get work done.  However, getting started was much harder than I anticipated.  Now that the furniture is placed where I want it (at least MOST of it), I had to decide what I wanted to do next. OVERWHELMING!

  One area I neglected last year was the inside of my desk.  Not only did I shove a lot of random things into my desk last year, I also stored a bunch of stuff inside of it when I was packing for summer.   So, Operation Desk Organization began!   It was a huge success. I feel MUCH better about it now.   Here is a picture of the finished long top drawer. 


By the way, how does one end up with SO many staple removers when one NEVER uses them?


After the inside of the desk was organized, I added the new tin can organizer that I made this summer.  I also added, the personalized pencil holder one of my students gave me, and my pen/marker holder.  Here is a look at the desktop. 


  I had a bunch of Post It notes with website usernames and passwords posted on the bulletin board near my desk last year.  It was so annoying to look at.  I took a few minutes today to create a “Technology Helper folder, which you can see posted on my bulletin board, near the computer (the green frog folder).    I simply taped some 3x5 cards down and wrote the website and username/passwords for each one.  I wrote myself a little abbreviation for some of my passwords, instead of writing out the whole password- just something to trigger my memory.  I don’t know about you, but I have registered for NUMEROUS websites.  I needed some way to organize all of them.  I think this will work well. Here is a picture of the inside:


Today, I also brought in the free half moon desktop I found off of Craigslist.  I have always wanted one of those cresecent shaped tables to use for guided reading however, they cost a ridiculous amount of money.  While not as large, this one will work just fine.  Plus, did I mention it was FREE!  I bought a shelving unit to use as table legs however; with my crate seats, it was too high.  I put an old student desk under it instead.  The desk was much more sturdy compared to the shelves.   Here’s what it looks like.  I think it needs a table skirt though.  Plus, I am planning on buying blue contact paper to put on the tops of all of my tables.  That may help a little bit. 


Next, I moved on to the morning meeting area.  This is still a work in progress.  So far, I have put the calendar together, started my tree on the wall, and put up the coffee filter clouds that I created.  As I am going with a frog theme this year, I thought I would turn this area into a little frog pond-esque area.  I think I need some cattails along the window columns, in addition to a sun  (maybe in-between  the two columns). 


Speaking of the frog theme, is this not the cutest frog cutout that you have ever seen?


I have always used a star theme in my room (as you can probably see from some of the pictures).  I can’t tell you what a pain it is to change all of my stars to frogs.  I had no idea I had so many stars throughout the room.   The next project involved changing the stars on the supply bins and supply shelf, to frogs.  Here is a picture of the final product:


I use these boxes for the students' supplies.  They keep their markers, crayons, glue, scissors, dry erase markers, glue sticks, and extra erasers in these boxes.  I bought these bins awhile ago as I hate those bulky pencil boxes students use for their supplies.  They take up SO MUCH desk space.  I usually throw out all of the crayon and marker boxes, place them in their own plastic bags (labeled of course) and put them in these bins.  It works well! 


   After working on the supply boxes, I shifted my attention towards the library.  I pulled out all of my fiction baskets and put them on the shelves.  As you can see, I still have to replace all of the labels.  I can’t tell you how much I wish all of my bins matched.  It drives me CRAZY!  I looked into the plastic spray paint however; they had a terrible color selection.  I digress.. anyway, I plan to put a frog stuffed animal in each crate seats for the students to read to.  I will also add them to my DEAR seat chart.  I still have to pull out the bean bag chair and all of my pillows.  I'm not quite sure where I will store those yet! 


Here is a shot of my leveled book collection and non-fictin roller cart.  I recently aquired the spinning book displays but am still unsure as to if I want to keep him. 


Last but not least. here is the start of my writing table.  Under the table I plan on storing my students’ writing binders.  While you can’t see in this picture, I also have some special papers for the students to use.  When cleaning my desk, I came across these self-adhesive hooks.  I placed those on the top of the writing desk.  I plan on putting word cards on binder rings for the students to reference and use.  I also have a drawer of shelves with tape, fancy pencils, neon pens, and little notepads.  The blue bins next to the table store envelopes, stickers for sticker stories, and an item to be determined! J . I am also planning on making a cute sign of some sort for the blue paper that you see. Again, this too is a work in progress.


Before I knew it. “All teachers need to leave the building by 2:30 rang through my speakers.  Day two- in the books.  I’m looking forward to tomorrow.  While I have an appointment and can’t get there till 12:30 again, I have to pick up our kittens before I head over.  I’m excited to see our little cuties again!


Let the Fun Begin.....


Day One- I was finally able to get into my classroom and get some work done.  When I say, “Get some work done, I actually mean, check to make sure all of my things are still in my room and move my furniture around. 

  When I left last June, the last thing on my mind was, “How do I want to arrange my furniture for next year.  Therefore, it was number one on my to-do list.  I couldn’t complete anything else without knowing where I wanted things to be placed. 

   I walked into the room to see this giant mountain of school items piled on my counter..


   Over the summer I was in communication with my administrators as I wanted to trade my student desks for tables.  I had been using desks for the past 3 years but wanted to change things up a bit.  After getting the approval, I was eager to get to the room to see which tables I was getting.  Was I ever surprised to go in and find 3 long tables ALONG WITH all of my classroom desks. 


My large room suddenly looked really small.  So, first thing was first, get the desks out!  I piled them up and then looked at the room I had to work with.  I have to tell you, I am thrilled with how much more room I have now that I did away with the desks.  Honestly, while the desks are nice for storage, I find that they cause more grief than benefit.  Plus, now that I have tables, I have room for carpets in front of my SMARTBoard.  Now, I can call the students over to sit in front of the SB for a quick lesson. Afterwards, we can go back to our tables to work. 


Next, I switched my morning meeting area with my library area from last year.  Here is a picture of the new morning meeting area:


And, here is a picture of the new library area:


Next to my non-fiction collection, I placed my listening station/art station.  Now, I really love this piece of furniture, HOWEVER, it is so large and cumbersome.  Due to the fact that the listening station chairs are attached to the back of the art station, you always have to have the piece sticking out from the wall- well, not anymore.  The art station now faces outwards, while the listening station is right up against the wall.  I thought this might be inviting for the students, creating a nook of sorts for them to sit in.  I have placed a little stool near it so the students can easily crawl in and out.  We shall see how this goes.  I am hopeful.


At 2:15, an announcement came on telling us that we had 15 minutes to evacuate the building.  Grrrrr summer hours!   I got to school at 12:30 today and was therefore only able to work for two hours.  Note to self. get to school early!


Monday, August 15, 2011

How to Avoid Being Buried in a Pile of School Supplies

    Let's face it, our students bring A LOT of supplies to school!  I remember when I first started teaching (I started in kindergarten), staying LATE into the evening, sorting supplies and putting everything away.  There is nothing more frustrating than getting your room in perfect condition for the first day of school and then looking at it at the end of day one, piles of supplies all over! 


  I've tried a couple of different ways to circumvent the late night stays (I want to go home and sleep after the first day of school)! Someone had suggested that I have a supply scavenger hunt.  The students would keep all of their supplies in their backpack until I called out a specific supply.  Once I called it out, they had to hold it up.  As they were holding it up, I checked off their name.   While this was a great idea in theory, it took FOREVER!  I knew I needed to change it up. 


   Now, I send home an introduction letter to my students a couple of weeks before school.  In that letter I invite the students to come to the school the day BEFORE school to meet me and drop off their supplies.  Of course, I am in my room getting things ready, so, why not!  I list a specific 2 hour window for them to stop by.  This way, I won't be interrupted all day, while I am trying to get work done.  


   How does this prevent the giant pile of supplies, you ask?  In the hallway I have boxes for each of the supplies the students are dropping off.  Above each box I post the name of the supply and a class roster.  When the student/parent puts the supply in the box, they check off their name.  I also provide Sharpie markers for those that forgot to label their supplies (this saves me the time of writing their names on their things late into the evening). Oh, I also put Post It notes out so parents can make a note for themselves if they are missing something.


  Afterwards, I bring the boxes into my room, add any labels that may be necessary, and place the supplies where I would like them.  It saves me a ton of time!  


                                                        Mrs. Kincaid's Linky Party